《Micro Frontends in Action》
Introduction
what
Micro frontends are not a concrete technology. They’re an alternative organizational and architectural approach for scaling development.
- Teams can work autonomously in their field of expertise.
- Teams can choose the technology stack that fits best for the job at hand.
- The applications are loosely coupled and only integrate in the frontend (e.g., via links).
how
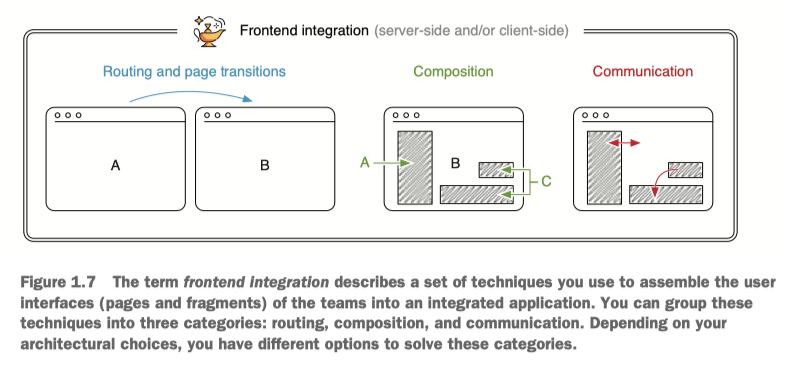
routing 指页面之间的 navigation
- 简单的方式,通过
<a>跳转,问题是会刷新页面 - 如果是
spa,一般是通过自建application shell或者三方框架,比如single-spa
composition 即页面内组件的组装
- client-side: 比如
iframe/ajax/web components - server-side: 比如
ssi/esiTailor/Podium
communication,即页面、组件之间的数据通信
misc
web performance
因为不同页面或系统是不同的团队来维护,这很可能造成代码冗余、引入了同一框架的不同版本等问题
shared design system
最好不同系统之间保持统一的 UI 样式,给用户良好的用户体验
shared knowledge
前端底层工具等不要重复开发,应该在大团队内共享,比如日志、监控、utils等。但是 sharing 也是有成本的,也要考虑跨团队合作,比如升级了日志系统,要通知相关团队进行测试等。
一种方案是 share nothing,虽然有冗余,但对于 mfe 这种要求 autonomy 以及更快的迭代的架构来说是可接受的。
pros&cons
pros
- autonomy
- higher iteration speed
- free technology choice
- support legacy system
cons
- redundancy,比如一个框架出现了问题,所有团队都要升级版本
- consistency,理想情况下,每个团队的数据是独立的,但是实际上,teamA可能会依赖teamB的数据,这就要考虑数据的一致性
- 每个子系统是一样的技术栈还是不同的技术栈?相同技术栈可以共享开发经验、基础建设等减少代码冗余,不同技术栈切换存在成本
原理
routing
<a href>- client routing via
app shell
composition
- iframe
- ajax
- web component
communication
- UI communication
- Frontend-backend
- data replication
js/css isolating
- js sandbox
- shadow dom/css modules
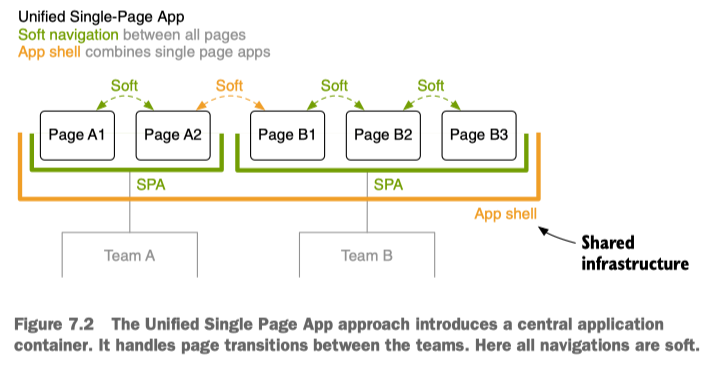
AppShell
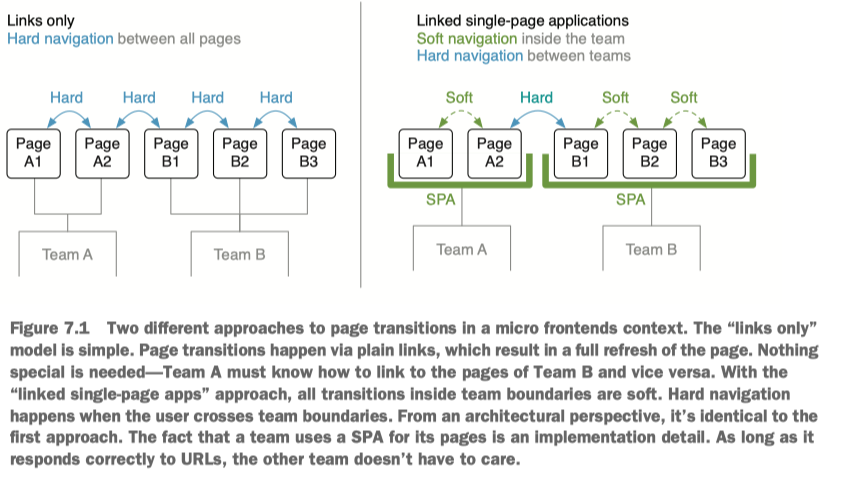
Hard navigation describes a page transition where the browser loads the complete HTML for the next page from the server.
Soft navigation refers to a page transition that’s entirely client-side rendered, typically by using a client-side router. In this scenario the client fetches its data via an API from the server.
what
app shell 监听 url change 然后渲染对应的 mfe,此外 app shell 可能还需要
- context information (language, userinfo)
- authentication
- error handling
- performance monitoring
flat routing
- app shell 要知道路由、组件的映射
- 组件之间需要知道 url,如果要实现组件间跳转
// app-shell.html
<div id="app-shell">
  <div id="app-content"><span>content not loaded yet</span></div>
</div>

// app-shell.js
const routes = {
  "/": "inspire-home",
  "/checkout/pay": "checkout-pay",
}
function updatePageComponent(pathname) {
  const comp = document.createElement(routes[pathname])
  appContent.replaceChild(comp, appContent.firstChild)
}
// 三方 history 实现
myHistory.listen(updatePageComponent)
updatePageComponent(window.location)

//
document.addEventListener("click", e => {
  if (e.target.nodeName === "A") {
    const href = e.target.getAttribute("href");
    myHistory.push(href)
    e.preventDefault()
  }
})
two-level routing
单层路由的问题在于 app shell 要维护所有 url,实际上只需要子系统的路径,系统内的跳转各自负责即可
app-shell 层和单层路由的代码一样,只是 routes map 只有顶级路由映射了
// app-shell.js
const routes = {
  "/": "inspire-pages"
  "/product/": "decide-pages",
  "/checkout/": "checkout-pages",
}
以 checkout 为例,页面地址为 /checkout/pay 时,代码运行如下
// checkout.ts
const routes = {
  "/checkout/pay": () => `<a href="/checkout/success">buy now</a>`,
  "/checkout/success": () => `<h1>Success</h1>`
};
class CheckoutPages extends HTMLElement {
  connectedCallback() {
    this.render(window.location)
    this.unlisten = myHistory.listen(location => this.render(location))
  }
  render(location) {
    const route = routes[location.pathname]
    if (route) {
      this.innerHTML = route()
    }
  }
  disconnectedCallback() {
    this.unlisten()
  }
}
window.customElements.define("checkout-pages", CheckoutPages);
iframe
<aside class="recos">
  <iframe src="http://localhost:3002/recommendations/eicher" />
</aside>
cons
- 页面刷新,iframe url 丢失
- 弹窗只能在 iframe 内显示
- 只能通过 postMessage 传递序列化内容
ajax
<aside
  class="decide_recos"
  data-fragment="http://localhost:3002/fragment/recommendations/eicher"
>
  <a href="http://localhost:3002/recommendations/eicher">
    Show Recommendations
  </a>
</aside>
<script src="/static/page.js" async></script>

// /static/page.js
(function() {
  const element = document.querySelector(".decide_recos");
  const url = element.getAttribute("data-fragment");

  window
    .fetch(url)
    .then(res => res.text())
    .then(html => {
      element.innerHTML = html;
    });
})()
pros
- integrate all content into one DOM
- progressive enhancement
- flexible error handling
cons
- async
- lacking isolation (css/js)
- server request required
- no lifecycle for scripts
web component
<aside class="decide_recos">
  <inspire-recommendations sku="eicher"></inspire-recommendations>
</aside>
<script src="http://localhost:3002/static/fragment.js" async></script>


// fragment.js
const prices = {
  porsche: 66,
  fendt: 54,
  eicher: 58,
};

class CheckoutBuy extends HTMLElement {
  connectedCallback() {
    const sku = this.getAttribute("sku");
    this.innerHTML = `
      <button type="button">buy for $${prices[sku]}</button>
    `;
    this.querySelector("button").addEventListener("click", () => {
      alert("Thank you ❤️");
    });
  }
  disconnectedCallback() {
    this.querySelector("button").removeEventListener("click");
  }
}
window.customElements.define("checkout-buy", CheckoutBuy)
pros
-
浏览器原生支持,组件有 lifecyle hooks
-
shadow dom自带隔离属性- 有自己的 id 空间
- 对主文档的 JavaScript 选择器隐身,比如 querySelector。
- 只使用 shadow tree 内部的样式,不使用主文档的样式
class CheckoutBuy extends HTMLElement {
  connectedCallback() {
    this.attachShadow({ mode: "open" });

    this.shadowRoot.innerHTML = `
      <style>
        button { background: rgb(75, 158, 204); }
      </style>
      <button type="button">buy for $${prices[sku]}</button>
    `;
  }
}
cons
- 在
vue/react兼容不是很好 - IE 不支持
shadow dom
Communication
- page-to-page: via simple links
- within one page
- parent to fragment
- fragment to parent
- fragment to fragment
parent to fragment
pass props
// decide.js
const buyButton = document.querySelector("checkout-buy")
platinum.addEventListener("change", e => {
  const edition = e.target.checked ? "platinum" : "standard"
  buyButton.setAttribute("edition", edition)
})

// checkout.js
class CheckoutBuy extends HTMLElement {
  attributeChangedCallback() {
    this.render();
  }
}
fragment to parent
emit custom event
// decide.js
const buyButton = document.querySelector("checkout-buy");
buyButton.addEventListener("checkout:item_added", e => {
  element.classList.add("decide_product--confirm");
});

// checkout.js
class CheckoutBuy extends HTMLElement {
  render() {
    this.querySelector("button").addEventListener("click", () => {
      this.dispatchEvent(new CustomEvent("checkout:item_added")) // emit event
    });
  }
}
fragment to fragment
- direct
- via their parent
- pub/sub
// inspire.js
window.addEventListener('hello', () => {})

// checkout.js
fragmentA.dispatchEvent(new CustomEvent('hello', { bubbles: true, payload: {} }))
使用 broadcast channel api 实现 pub/sub
// inspire.js
const channel = new BroadcastChannel("tractor_channel");
channel.onmessage = function(e) {
  if (e.data.type === "checkout:item_added") {
     console.log(`tractor ${e.data.type} added`)
  }
}

// checkout.js
const channel = new BroadcastChannel("tractor_channel")
const buyButton = document.querySelector("button")
buyButton.addEventListener("click", () => {
channel.postMessage({type: "checkout:item_added", sku: "fendt"}
assets loading
前面解决的主要是应用的分发,应用一旦加载到主应用内,意味着主应用和子应用同处于一个页面内,html/css/js 很可能存在资源冲突
- 主/子应用都有
<div class="nav"></div>,子应用有这行代码document.quertySelector('.nav') - 主应用的样式
.nav {},子应用也有.nav {},相互影响 - 主应用存在全局变量
window.vue,子应用也存在window.vue,发生覆盖
isolating
html
对 DOM 的访问,一种解决方法是只在子应用的 DOM 内搜索,比如 micro-app 重写了 querySelector
const querySelector = (selector) => {
  const app = getCurrentApp()

  if (!app) {
    return rawQuerySelector(selector)
  }

  // app.container 就是子应用的 root
  return app.container.querySelector(selector)
}
css
BEM,每个子应用取一个自己prefix- 使用
css module在打包的时候自动创建唯一的命名 shadow dom,纯天然的隔离
micro-app 内部是用 prefix 的方式,具体实现是 scopeCSS()
micro-app[name=xxx] .nav {
  background-color: red;
}
但是这种方式不是100%隔离的,如果在主应用添加 .nav { color: white } 还是会影响到子应用。
js
- 创建一个独立的作用域,避免变量冲突
- 避免 global(这里是
window) 污染,包括全局变量、全局事件的监听、卸载等
第一个问题用 IIFE 就能解决
((window) => {
  let a = '1'
})(something)
第二个问题主要用 sandbox 解决,每个子应用都有自己的 sandbox。sandbox 的实现主要有2种思路:snapshot & proxy,具体实现参考 15分钟快速理解qiankun的js沙箱原理及其实现 不再赘述。
shared
不同子应用之间的框架使用情况
- 同一种框架
- 各使用各的
- 受限的框架,比如大小少于 10KB
对于同一种框架,直接在全局引入是最省性能的
// app shell
<script src="dist/vue2.js"></script>
业务在打包的时候,配置 external 即可
externals: {
  vue: 'vue',
  react: 'React',
}
但有个问题,要如何升级呢?比如现在是 vue2,现在要升级到 vue3,如果要等所有子应用都适配 vue3,不知道是什么时候。
一种方式是使用 DLLPlugin,如下有个独立的 vendor 模块
vendor
 - static
   - vue_2.js
   - vue_3.js
 - manifest_2.json
 - manifest_3.json
 - webpack.config.js

module.exports = {
  // ...
  entry: { react: ["vue",] },
  output: {
    filename: "[name]_3.js",
    path: path.resolve(__dirname, "./static"),
    library: "[name]_[hash]"
  },
  plugins: [
    new webpack.DllPlugin({
      context: __dirname,
      name: "[name]_[hash]",
      path: path.resolve(__dirname, "manifest_3.json")
    })
  ]
}
子应用如何使用
{
  "dependencies": {
    "vue": "^3.2.0",
    "shared-vendor": "@xx/vendor"
  }
 },
}

plugins: [
  new webpack.DllReferencePlugin({
    context: path.join(__dirname),
    manifest: require("vendor/manifest_3.json"),
    sourceType: "var"
  })
]
框架
single-spa
子应用配置 bootstrap/mount/unmount 的钩子,内部监听 hashchange/postate 实现路由分发,缺点很明显
- 子应用入口是
js,但打包产物有chunk-[hash],这是不固定的 - 缺少
js/css isolating,需要业务自己处理
micro-app
和 single-spa 不同,micro-app 是基于 web component (严格来说是类 web component),整体的接入成本非常低
customElements实现自定义元素<micro-app>,具有类似single-spa的 lifecycle (connectCallback/)- 模拟
shadowDOM,实现html/js/css isolating - 基于
pub-sub实现数据通信pub-sub
app shell 路由
根据文档,基座采用 history route,子应用采用 hash route
// app shell router/index.ts
const router = createRouter({
  history: createWebHistory('base'),
  routes: basicRoutes
})

// 子应用 router/index.ts
const router = createRouter({
  history: createWebHashHistory(),
  routes: basicRoutes,
})
子应用路由
因为业务采用 monorepo,每个子应用都是一个 package,我们可以把应用元信息(比如子应用的地址 url、开发端口 port)写到 package.json,
{
  "name": "@micro-app/mockme",
  "description": "API Mock",
  "devPort": 3008, //
  "url": "/child/mockme/", // 访问地址
  "outDir": "../../dist/child/mockme", //
}
然后每次启动 vite 遍历 [micro-app]/package.json 获取每个子应用的配置,通过 define 注入到业务,从而动态创建路由
// script.ts
export function walkMicroFE(config, relPath = "") {
  const dir = path.resolve(relPath || process.cwd(), "packages");

  const files = fs.readdirSync(dir);

  files.forEach((file) => {
    const filePath = path.join(dir, file);
    const stats = fs.statSync(filePath);

    if (stats.isDirectory()) {
      try {
        // 可能没有
        const data = fs.readFileSync(path.join(filePath, "package.json"));

        const jsonData = JSON.parse(data);

        // 说明这是一个mfe的包
        if (jsonData.name.startsWith("@micro-app/") && jsonData.devPort) {
          const id = jsonData.name.replace("@micro-app/", "");

          config[id] = {
            mfeName: id == "base" ? "" : "app-" + id,
            name: jsonData.name,
            description: jsonData.description,
            devPort: jsonData.devPort,
            url: jsonData.url,
            outDir: jsonData.outDir,
          };
        }
      } catch (e) {}
    }
  });

  return config;
}

// vite.config.ts
const mfeEntryUrlMap = walkMicroFE({}, path.resolve(process.cwd(), '..', '..'))
define: {
  __APP_MFE__: JSON.stringify(mfeEntryUrlMap),
},

// routes/index.ts
function buildMicroRoutes() {
  const routes = []

  console.log('buildMicroRoutes', __APP_MFE__)

  Object.keys(__APP_MFE__).forEach((name) => {
    const { url, description, mfeName } = __APP_MFE__[name] || {}

    if (name !== 'base') {
      routes.push({
        path: url + ':page*',
        name: mfeName,
        component: buildPage(name),
        meta: {
          title: description,
        },
      })
    }
  })
  return routes
}

export const asyncRoutes = buildMicroRoutes()
export const basicRoutes = [...WhiteRoutes, ...ConstantRoutes, PageNotFoundRoute]
注意这段代码 buildPage
import { defineComponent } from 'vue'

export default function buildPage(name: string) {
  const { url, mfeName, devPort } = __APP_MFE__[name] || {}

  const hostname = __APP_DEV__ ? `http://localhost:${devPort}` : window.location.origin

  const realUrl = `${hostname}${url}`

  return defineComponent({
    name,
    setup() {
      return () => (
        <div>
          <micro-app name={mfeName} url={realUrl} iframe></micro-app>
        </div>
      )
    },
  })
}
启动服务
// main.ts
import microApp from '@micro-zoe/micro-app'
microApp.start()
数据通信
前文提到,micro-app 是使用 pub-sub 实现数据通信的,简单实现如下
// data.js
const BASE_EVENT_NAME = '__from_base_app___'
const MICRO_EVENT_NAME = '__from_micro_app___'

export class EventCenterForBaseApp {
  setData (appName, data) {
    eventCenter.dispatch(BASE_EVENT_NAME, data)
  }
}

export class EventCenterForMicroApp {
  constructor (appName) {
    this.appName = appName
  }
  addDataListener (cb) {
    eventCenter.on(BASE_EVENT_NAME, cb)
  }

  dispatch (data) {
    const app = appInstanceMap.get(this.appName)
    if (app?.container) {
      const event = new CustomEvent('datachange', {
        detail: {
          data,
        }
      })
      app.container.dispatchEvent(event)
    }
  }
}

export default class SandBox {
  constructor (appName) {
    this.microWindow.microApp = new EventCenterForMicroApp(appName)
    // ...
  }
}
然后重写 setAttribute,因为 <micro-app> 是一个自定义元素,父子间的通过是通过属性的变更
// /src/index.js
import { EventCenterForBaseApp } from './data'
const BaseAppData = new EventCenterForBaseApp()

const rawSetAttribute = Element.prototype.setAttribute
Element.prototype.setAttribute = function setAttribute (key, value) {
  if (/^micro-app/i.test(this.tagName) && key === 'data') {
      BaseAppData.setData(this.getAttribute('name') /* micro-app name*/, value)
    }
  } else {
    rawSetAttribute.call(this, key, value)
  }
}
父应用传递消息给子应用
// 主应用
<micro-app
  name='basement'
  url='http://localhost:3001/'
  :data='data'
></micro-app>

setTimeout(() => {
  this.data = {
    name: '来自基座应用的数据'
  }
}, 2000)

// 子应用 basement 内监听
window.microApp?.addDataListener((data) => {
  console.log('data from base app: ', data)
})
子应用传递消息给父应用
// 子应用 basement 内派发事件
window.microApp?.dispatch({ name: '来自子应用的数据' })

// 主应用
<micro-app
  name='basement'
  url='http://localhost:3001/'
  :data='data'
  @datachange='handleDataChange'
></micro-app>

const handleDataChange = (e) => {
  console.log('data from micro-app', e.detail.data)
}
业务中使用的是全局通信,有2个用处
- 存放全局数据,比如用户信息
- 判断 token 是否失效,通知 app shell 退出系统
// main.ts
microApp.addGlobalDataListener((data: any) => {
  if (data.code == HTTP_RESPONSE_CODE.TOKEN_INVALID) {
    const userStore = useUserStoreWithout()
    userStore.reLogin(data)
  }
})
microApp.setGlobalData({
  fetchUserList: AccountService.getUserList,
})
window.microApp = microApp

// 子应用使用
const userList = await window.microApp?.getGlobalData().fetchUserList()